
Highlight Any Audio with Overcast & Bear
A Shortcut for Audio Highlighting using SRT Subtitle files. Overcast, Bear, and Readwise Integrations.

If you are into knowledge management and making highlights of media you consume, here’s something for you. There’s already some tools for audio highlighting of published content. I have Readwise’s Reader, which does offer an ‘okay’ solution for Youtube videos. The automatic transcript is hit-and-miss and you have to be online, though. I also got Snipd for podcasts, but this only supports English speaking podcasts and public feeds, which I find very limiting.
How about a class you purchased and you have access to the audio file? A lecture? An interview? How about listening to the audio of YouTube videos on the go and without Internet access, highlight them and have close-to-perfect transcriptions in any of the Whisper AI supported languages?
I’m excited to share my solution with all of you: a Shortcut for creating transcribed Highlights of any audio files you have, with a built-in feature to upload those highlights to Readwise.
Here’s what you’ll need:
Overcast podcast player.
This is the only free podcast app I’ve found with Shortcuts integration for exporting a timestamp of the current play location.
Audio file on an RSS feed to play through Overcast.
You can easily set this up on Huffduffer for free. They give you an RSS feed where you can post any audio file you have a direct link to. I have Dropbox, and I can share any link to an audio file modifying it LIKE THIS prior to saving it in HuffDuffer.
An SRT of your audio.
Whether you opt for your own audio on an RSS feed or a podcast, you will still need the actual file for you to create the SRT.
I recommend AIKO for high quality and free SRT creation using Whisper AI.
Bear.
For the actual export and processing of your highlights.
Optional. It’s integrated with the Shortcut for you to upload the processed highlights.
The Shortcuts
HIGHLIGHT PROCESSOR (updated on 08/25/23 at 07:40 PM)
NOTE: The original sent out version of this article had an outdated version of the Highlight Processor Shortcut. If you happened to make any highlights with it, you probably encountered an error when uploading to Readwise, processing or re-processing highlights. The fix—for any of you that downloaded the Shortcut from the email—is: first, download the updated Highlight Processor Shortcut from the link above. Second, in the bottom of your Bear note, there is a code block with an SRTLocation and iCloudLocation. Make sure you replace “Highlighter” with “Highlights” . Also mare sure to change the extension at the end of SRTLocation from .txt to .srt . Your new Highlight Processor Shortcut should work without any problems now.
Setting Up the Source
If you are using HuffDuffer to set up your audio feed for use in Overcast, here’s two steps you can take to get the source of your audio right from the beginning:
In the ‘description field’ of your HuffDuffer upload, make sure the first line is the name of your source. This will be the title of your Bear note when you process the highlights.
Make sure the second line is the link to the source, if applicable. This link will appear in the footer of your processed highlights note and will later be transferred to Readwise.

Highlighting
Listen on Overcast and trigger the “Highlight” shortcut any time you want to create a Timestamp.
There’s various triggering methods for Shortcuts but my favorite is holding my AirPods for two seconds (which calls Siri) and say “Highlight.” I also have the shortcut as a widget in my today view.
You do not need to pause before highlighting, but if you do, Overcast will resume playing after saving the timestamp.
The first time you create a highlight, a “Timestamps.txt” file will be created in your Shortcuts folder in the following path: Highlights/Podcast Title/Episode/
I suggest you double check this was created at least the first time you run the Shortcut to make sure it’s working properly.
Listen and highlight the entire episode or audio file prior to processing your saved timestamps.
Processing your Highlights
Before running the Highlight Processor shortcut, make sure you place your SRT subtitle file next to the automatically created Timestamps file.
After you follow the prompts for selecting the Podcast and Episode, a new Bear note with your highlights will be created.
Here’s what’s actually happening:
For every timestamp created, the “Highlight Processor” shortcut will look for the matching subtitle and highlight it in markdown.
It will then look for a “look-back” and “look-ahead” range and merge all the subtitles in between.
The default look-back value is 70 seconds, and look-ahead is 15 seconds. You can change this if you go inside the actual shortcut setup.
The note is created with all the highlights listed :)
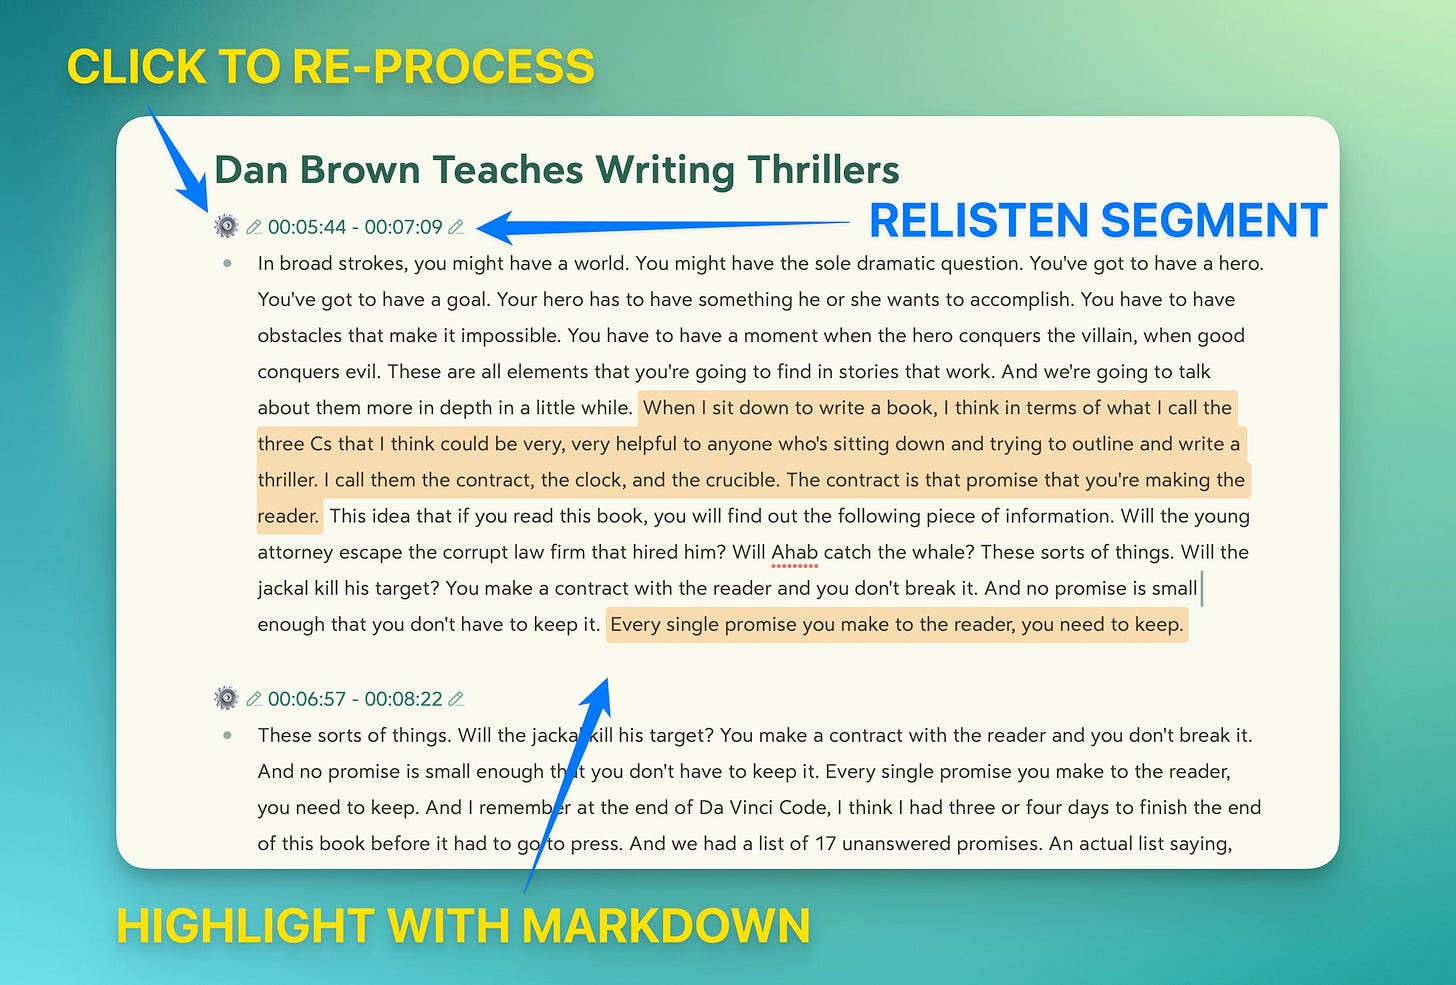
What if the text was cut off too soon or you want it to include more than the last 70 seconds? Click the gear emoji to re-process that specific highlight. Once you see the reprocessed highlight in a popup, this will also be on your clipboard, so you can replace the previous one.
Process your highlights by highlighting them in markdown before uploading to Readwise.
The extracted text from your subtitles will most likely have much more than what you need. At this point don’t worry about editing them or giving them any formatting. Just look for that “something” which made you save the timestamp and highlight it with markdown. Make sure you don’t introduce any new line breaks or the “upload to Readwise” may not work properly. It’s pure joy to do this on desktop with the “CMD + SHIFT + M” keyboard shortcut, by the way.
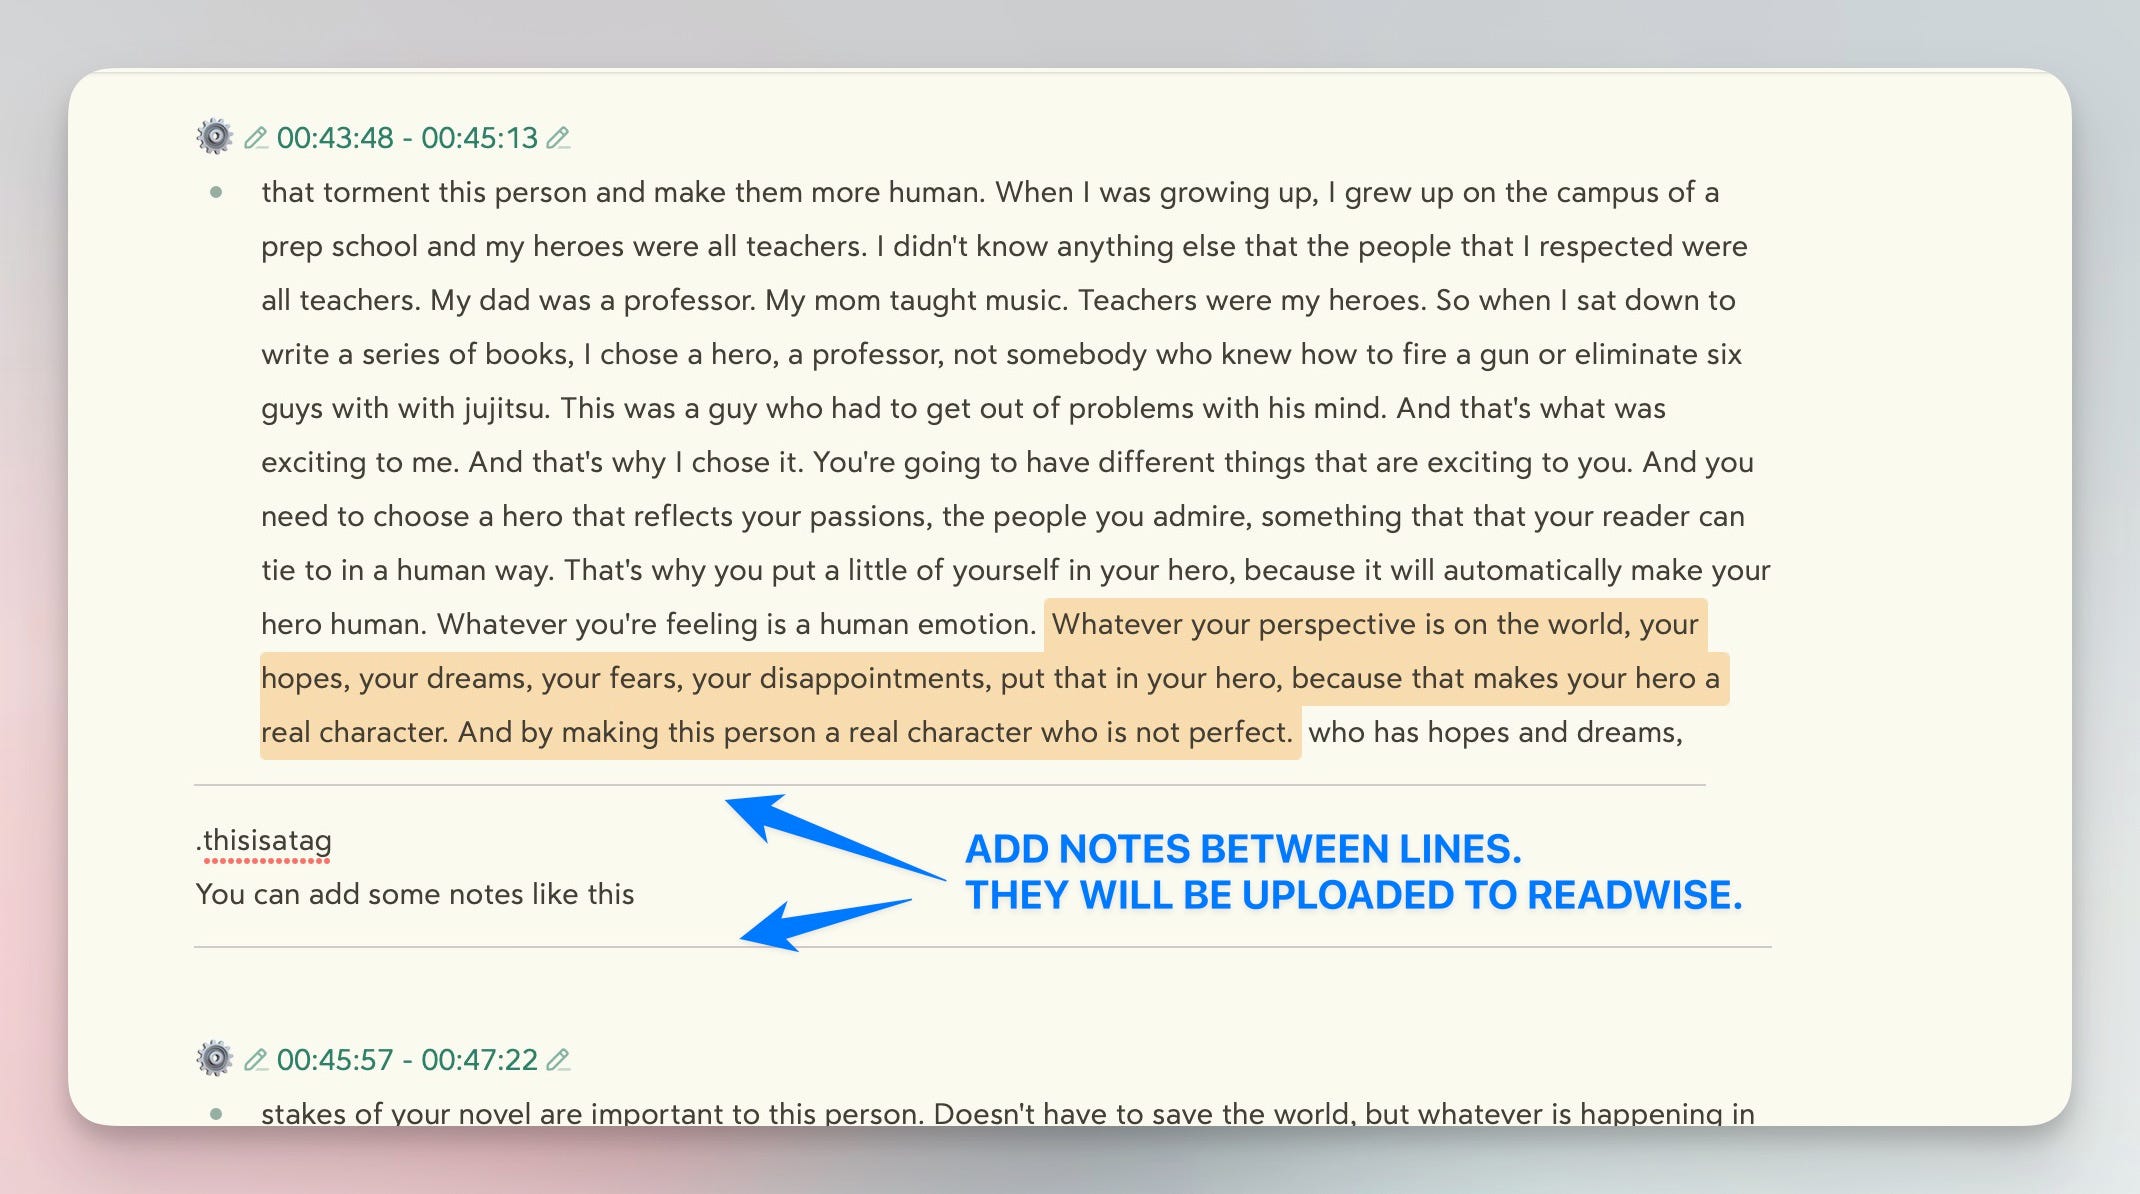
If you do highlight multiple segments within one block of text, these will be merged together, one after the other, when uploading to Readwise.
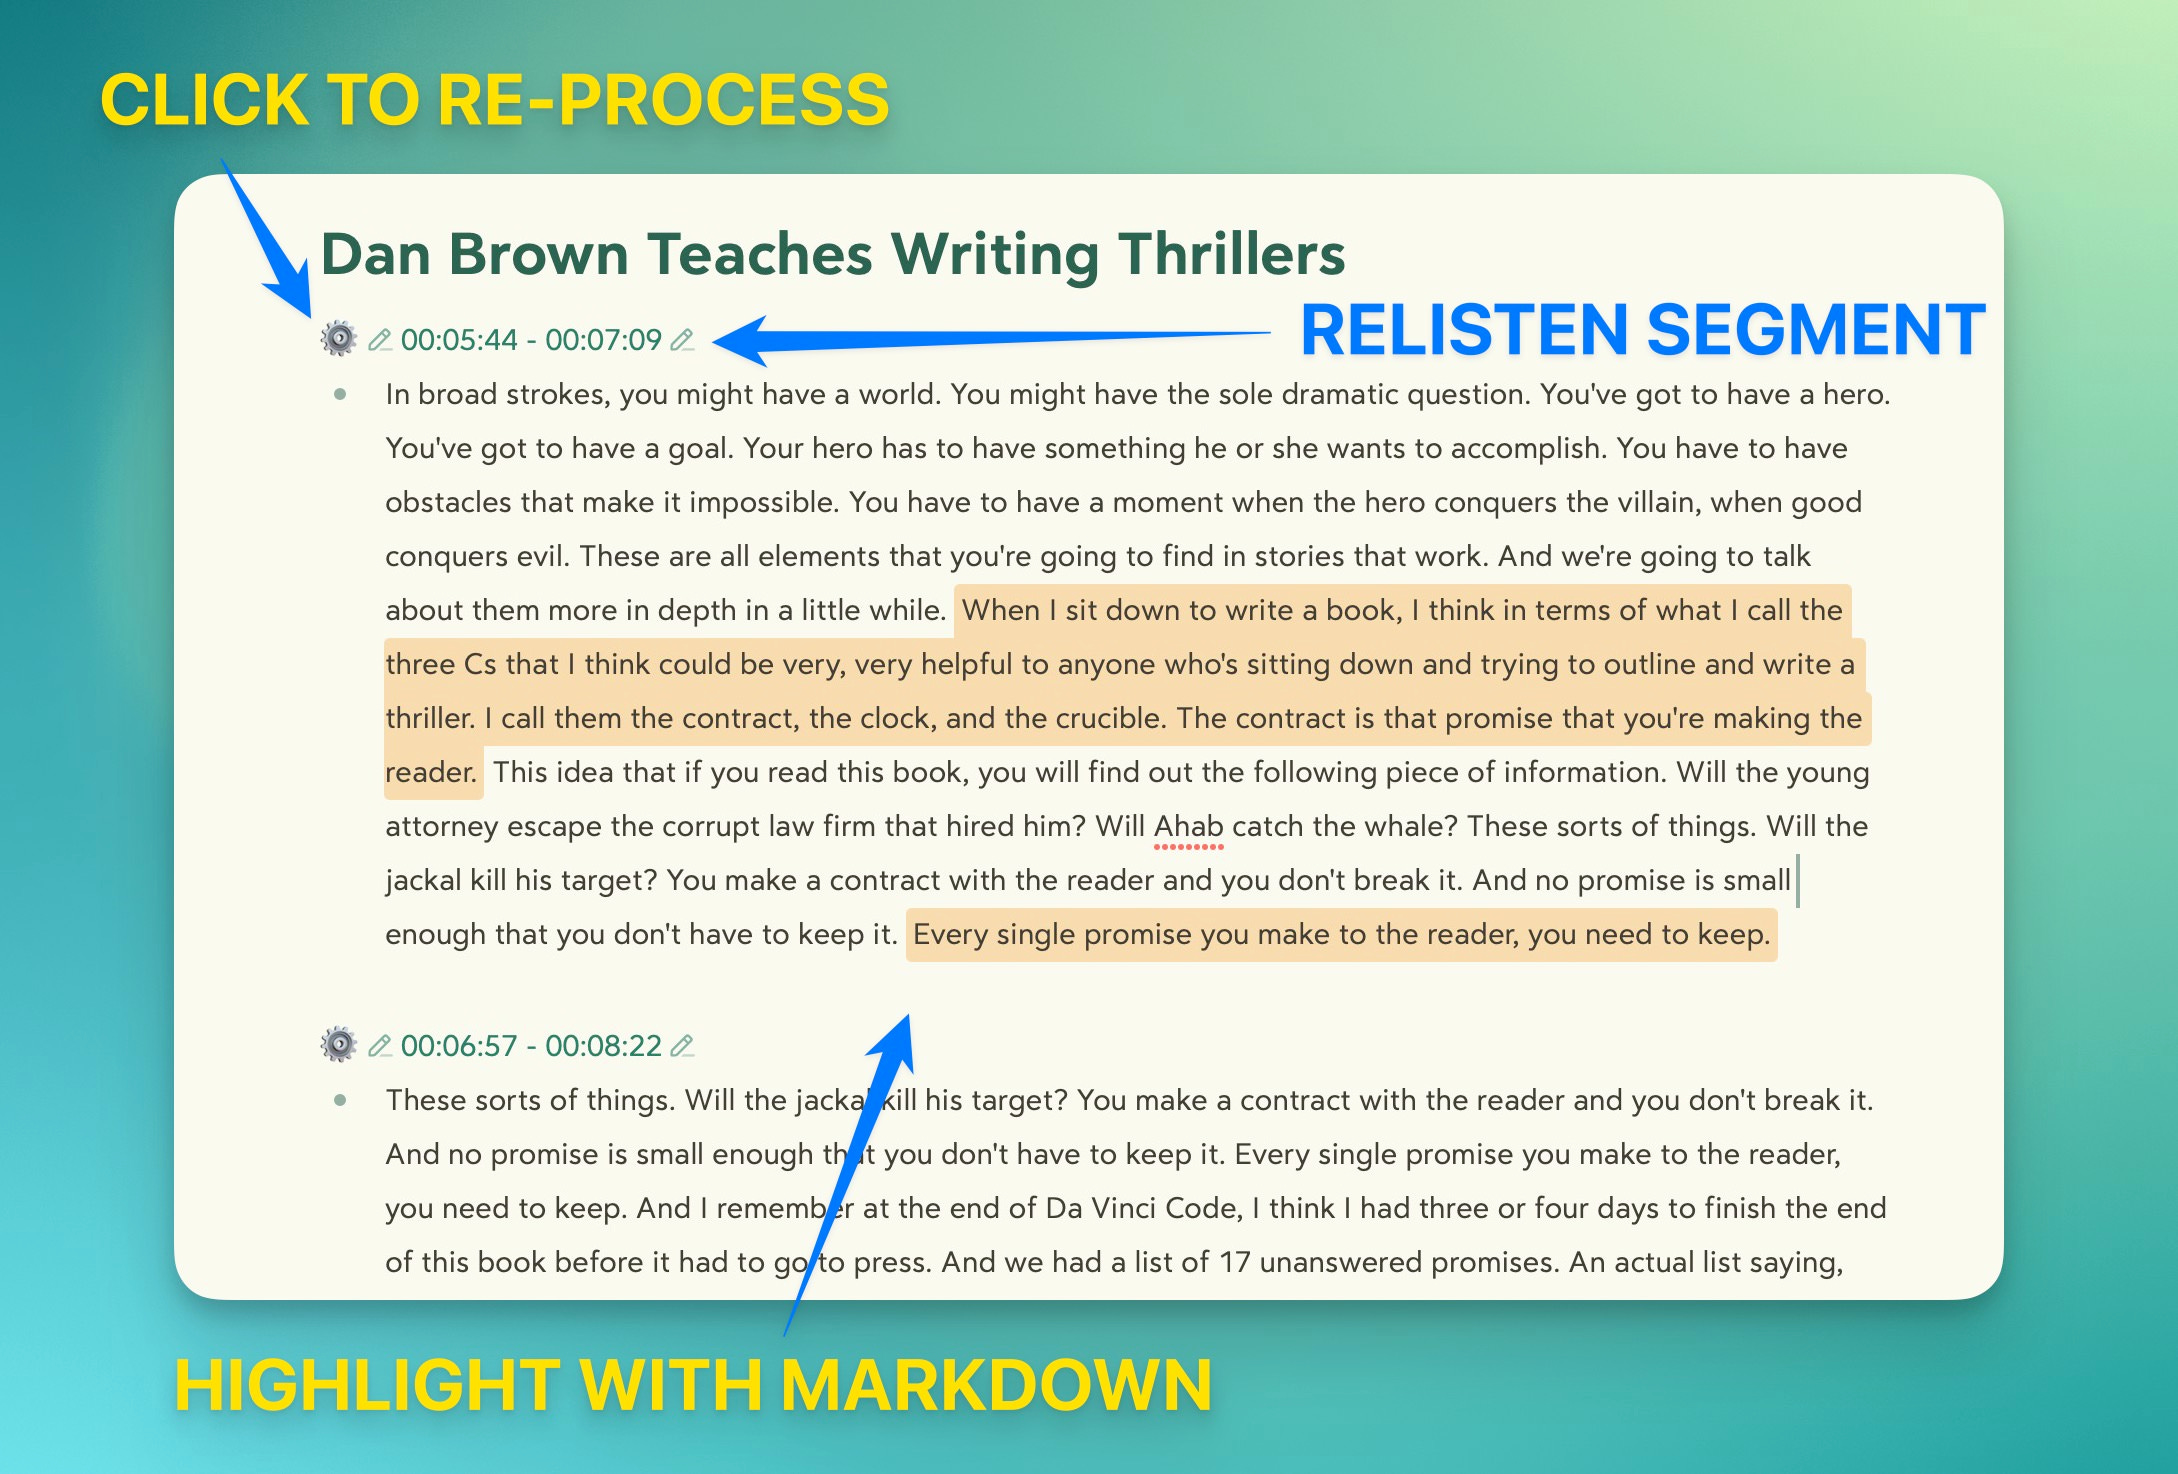
Want to add notes or inline tags for them to be synced to Readwise? Add them between lines. Make sure to not introduce any double line breaks between the markdown lines (single line breaks are ok).

If you decide to discard the highlight, there’s no need to delete anything. Just remove any markdown highlights.
After you are done you can select the “UPLOAD TO READWISE” link at the bottom.
The shortcut will give you the option to delete the Bear note, SRT and Timestamp files after uploading your highlights to Readwise. Make sure you got the Highlights up on Readwise if you decide to proceed with this.
Closing
There you have it guys. Once you have HuffDuffer setup and your feed is in Overcast everything is much more simpler than it reads. I have been listening + highlighting some online classes and this method has been working flawlessly for me. I hope this is helpful to some of you!
If you find this Highlight Shortcut useful, I would be incredibly grateful if you could support me by buying me a coffee at THIS LINK. Your generosity would mean the world to me.
Happy highlighting!

If you liked this you may also enjoy some content I have up on my YT Channel! I don’t hang around social media a lot, but when I do I’m on IG or Twitter. You can also check out some of my online classes, listen to my music, or in case you haven’t already, subscribe to my weekly newsletter. Thank you for reading!
Hello, thanks for creating this set of shortcuts. Im having issues with the second shortcut (Highlight processor), Im not sure how to select the respective folder (current podcast episode I've "highlighted") not sure what I'm missing, but I'm not getting a prompt to select the folder to process. (Ive tried on both iPad and iPhone)